Sunday, October 26, 2014

Sometime in the Morning - Granola-Topped Breakfast Muffins

 Sometime this morning, I developed an unusual ear worm, the obscure "Randy Scouse Git" by the Monkees.  Besides the fact that the lyrics make no sense, this particular ear worm drew attention to another annoying, but inevitable fact - that I am a lady of mature years.  Sigh.  In my head I am still 18 years old, while in the mirror - well, I try not to look in the mirror too often.  Ear worms, however, have no such mercy, and can evoke age-old memories.  In 1967, the year "Randy Scouse Git" was released, the Monkees were in their second season on TV, and I was between my freshman and sophomore years in high school, finally finished with the year-long planning leading up to my brother's delightfully overblown bar mitzvah, where I wore the worst dress ever. Adolescence was not just creeping up on me, but smacking me repeatedly upside the head.  


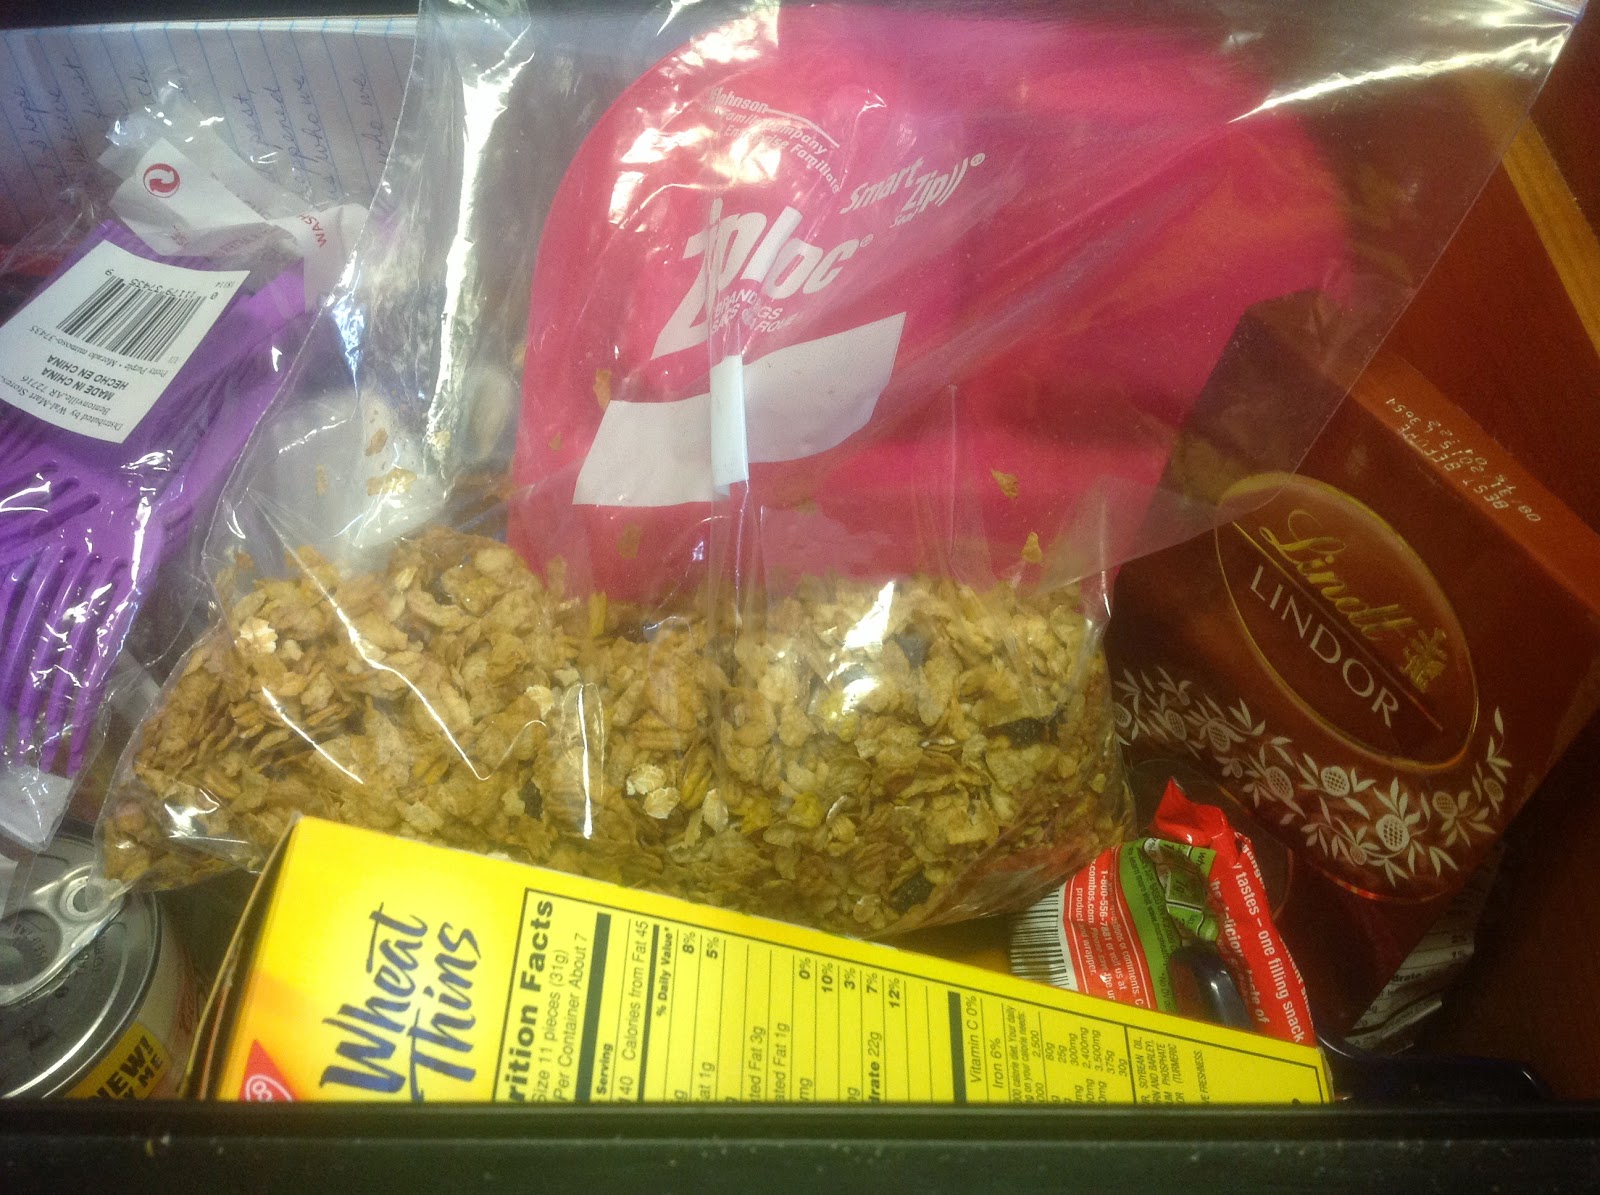
Being now of mature years, I occasionally try to adopt a healthy life style, which explains the bag of granola in my desk drawer at work.  Fiber, you know.  I eat dry cereal without milk (gag if you must) and carry this bag between car and office.  It's quite good, with raisins, chopped dates, and pecans.  In one of my adult ADD moments, I kept staring at it until it occurred to me these would be a fine addition to breakfast muffins.  So I shlepped the bag home to work out a muffin recipe that would successfully incorporate my granola.


One small problem, however - I have no luck with muffins.  I can bake almost anything, and when I was younger I even decorated cakes, but muffins are my Waterloo.  They alway seem to come out too small, too dense, and too boring.  But if I could teach myself to make really good spaetzle at the age of 61, I could give muffins one more try.  Or so I reasoned.

I have a couple of muffin cookbooks in the house, but they have generally led me down the path of muffin failure, so I took to the internet, using search terms like "granola topped muffins" and "fluffy muffin recipes."  Within 10 minutes, I was suffering from cognitive overload.  I skimmed about a dozen recipes like I was briefing a case for my Federal IncomeTax Law class (fast and dirty) and came up with this recipe.  I was quite pleased with the light, even crumb of the interior, the attractive muffin top, and of course, the taste.  Oh, and the moistness.  Amazing.  Almost as amazing as the spaetzle.


Granola-Topped Breakfast Muffins

3/4 cup cake flour
1/3 cup sugar
1/4 teaspoon each of salt, baking powder, baking soda, and cinnamon1 extra large egg
2 tablespoons canola oil
2/3 cup applesauce (I used Musselman's chunky, because that's what was open in my refrigerator)1 cup of your favorite granola (I used Post's Great Grains Cereal with Raisins, Dates, and Pecans)

Preheat oven to 400 degrees.  Spray 6 of the wells of a standard muffin pan, including the top, and set aside.

In a medium bowl combine the flour, sugar, salt, baking powder, baking soda, and cinnamon.  Combine well, using a small whisk.  Make a well in the center and set aside.


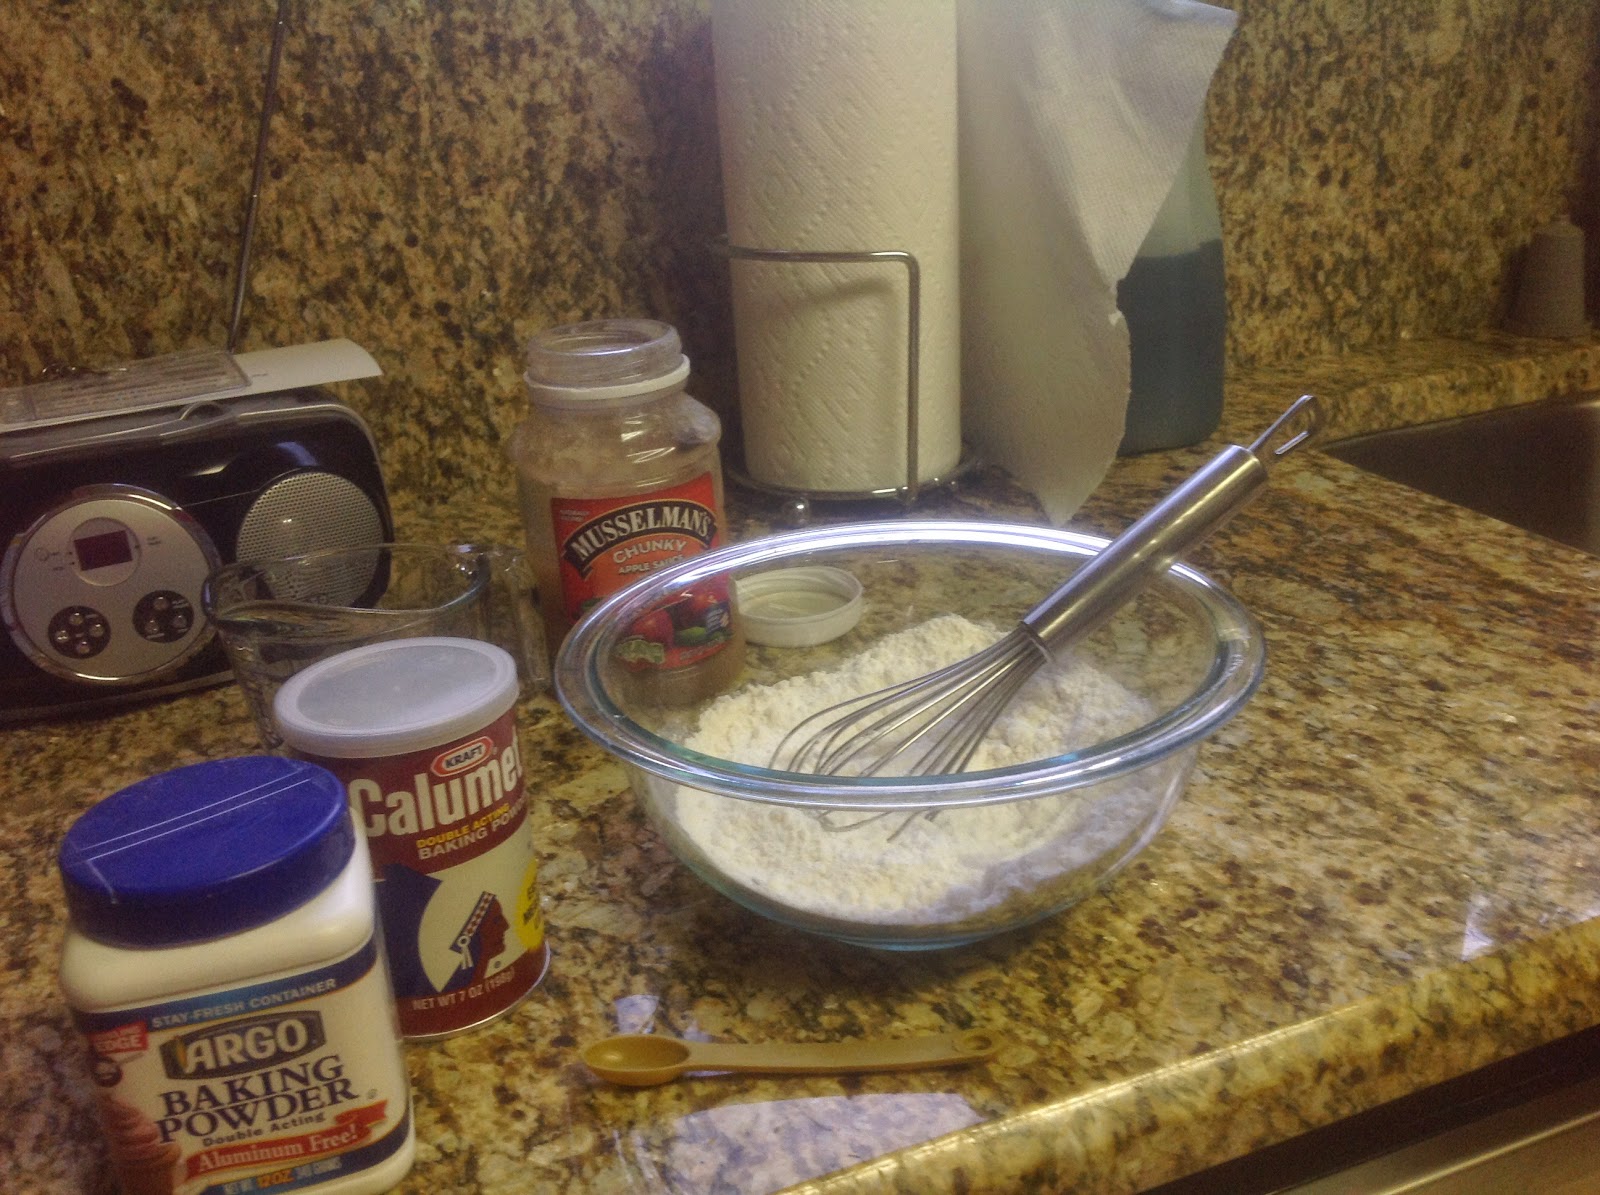
In a 1-cup glass measuring cup, use the small whisk to beat the egg till smooth.  Add the oil and the applesauce and use the whisk to combine them all.  I also used the whisk to mash or break up the apple chunks.

Pour the liquid ingredients into the well in the flour mixture, and using a rubber spatula, gently combine wet and dry, just until the white flour is no longer visible.  Don't worry about lumps in the batter, they are normal and desirable in muffins.

Spoon the batter into the prepared muffin pan wells.  The batter will fill 5 to 6 cups, depending on the depth of the well.  Fill close to the top of each cup.   Now with a lavish hand, sprinkle granola over the top of each muffin.  Place the pan into the preheated oven and bake for 18 minutes, watching the granola so it doesn't burn.


Remove the muffin pan from the oven and place on a rack to cool for 5 minutes.  While cooling, carefully brush the excess granola from around the edges of each muffin.  Then, with the tip of a sharp little knife, remove the muffins from the pan and place them on the rack to finish cooling.


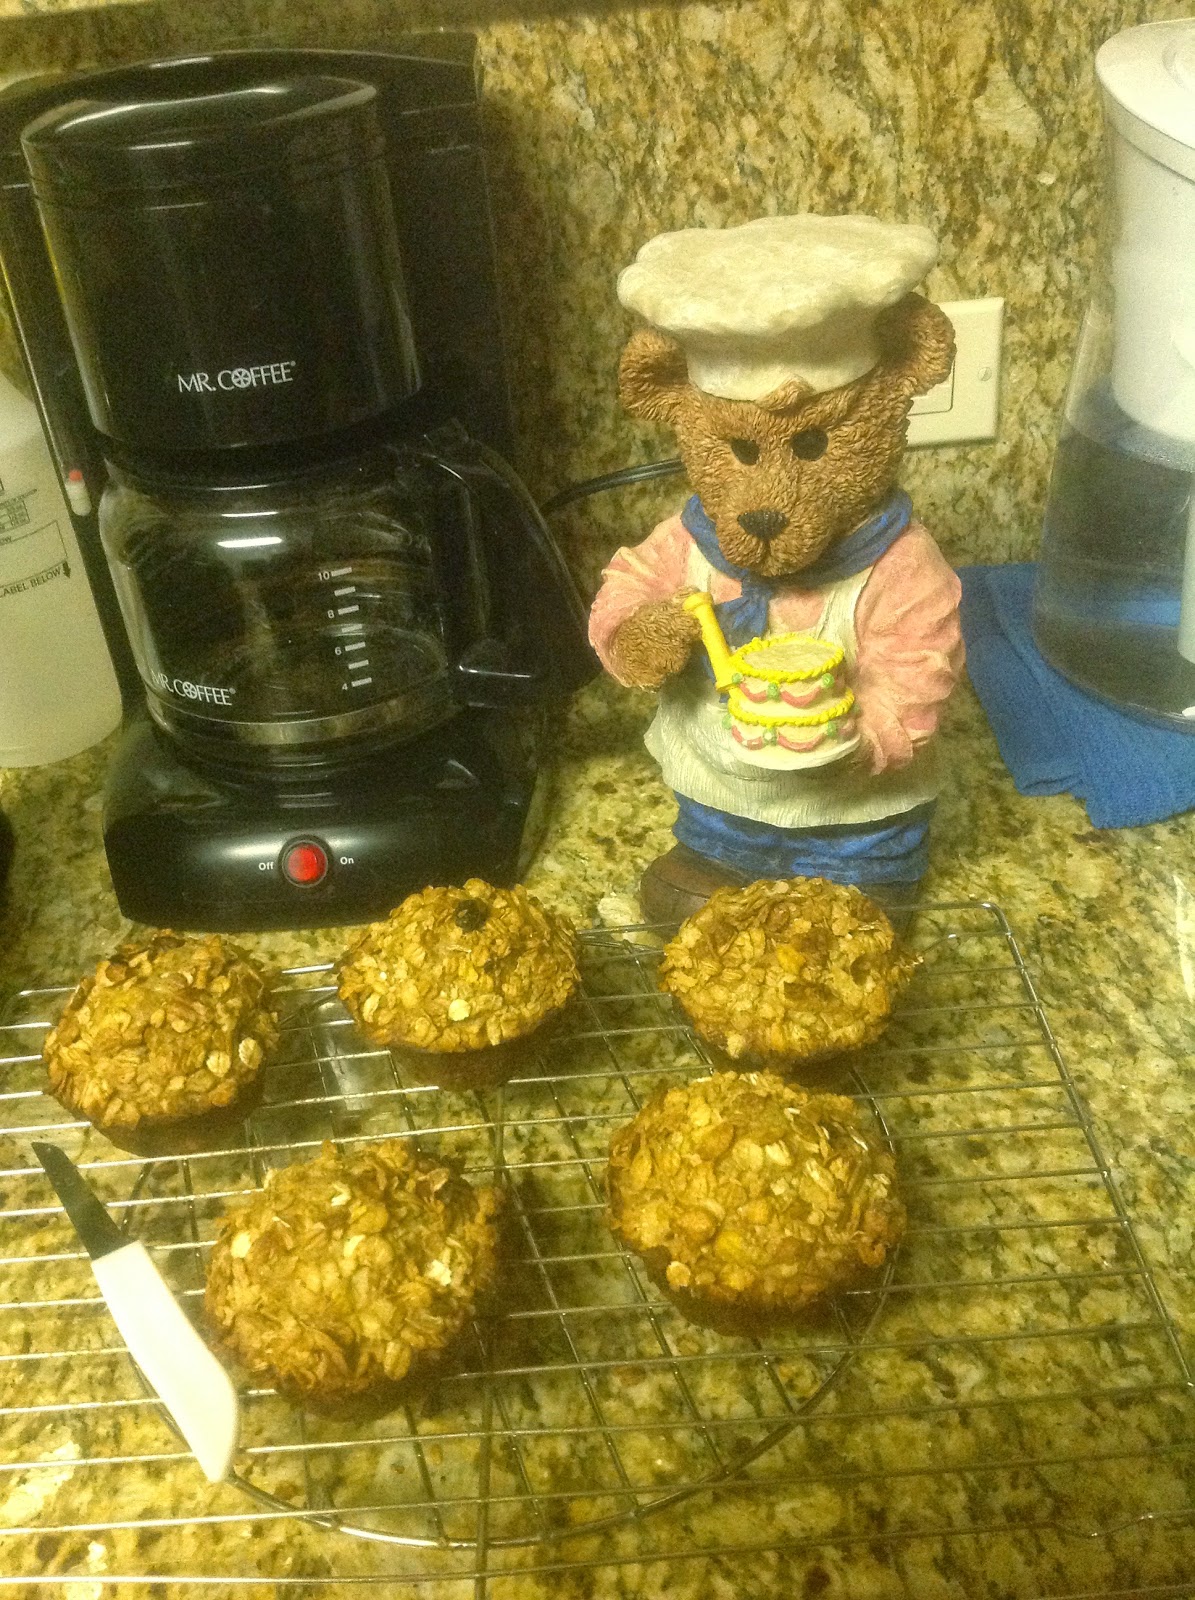
These are rather good with a little butter.  Or a lot of butter.  Or Temp-Tee whipped cream cheese.  Eat over a plate, because granola will fall.  These are going to make a really good (and nominally healthy!) breakfast.

Saturday, October 25, 2014

The Happy Hangover - Sausage and Peppers Linguine Dinner

I woke up with what seemed to be a hangover.  Since I rarely drink, that was unexpected and extraordinarily annoying.  And painful.  And that was the end of my plans to get some food shopping done.  Which did not stop me from cooking today.  I guess that makes it a happy hangover.

I wanted a hearty pasta sauce to serve over spaghetti, and while I was missing some crucial ingredients for a traditional meat sauce or a bolognese, my freezer came through.  Like most home cooks, I always have jarred pasta sauce in the pantry.  My freezer may have a few things others don't - sliced beef liver, tasso ham, squid and calamari - but I also had the obligatory frozen vegetables plus a half package of Italian sausage links.

Spending the day at home, nursing a headache while working ever-so-slowly on my recipe collection, did not stop me from throwing together a rich and delicious spaghetti sauce.  


The recipe collection project is going better than expected.  It has already taken me about 2 months to sort through and organize the papers, and then there was a lot of photocopying to replace clippings from a 1984 Bon Appetit and the backs of pasta boxes.  I am at the point now of putting the recipes into clear plastic sheet protectors and from there into 3 ring binders.  That blue notebook contains all of my recipes for appetizers, plus a section for sauces, dressings, marinades and the like.  Today I've been working on salads, vegetables, and soups, and hope to have them tucked into a green notebook before too long.

Tonight's dinner involves a crockpot, which you may have guessed from my description of a sitting-on-the-couch sort of day.  The 4 quart is a perfect size.  It is literally the only pot you are going to need.

Sausage and Peppers Linguine Dinner

Olive Oil
3 Italian sausages, frozen (hot or sweet)
3 cloves garlic, peeled
1 - 24 oz. jar marinara pasta sauce (I used Classico Marinara with Plum Tomatoes and Olive Oil) 
1/2 cup each red wine and water (put into the sauce jar, cover and shake to get any sauce on the sides of the jar)
Italian seasoning blend
kosher salt
black pepper
granulated garlic
pinch or more of sugar
1 - 14 oz. bag frozen pepper and onion blend
about 6 oz. of linguine pasta, broken in half
another 1/2 cup of water

In the crockpot, place the frozen sausages and garlic and a drizzle of olive oil.  Season with the Italian seasoning blend to taste. Cover and cook on the High setting for 30 to 45 minutes.  Turn the sausage and cook for another 30 minutes.  Add the marinara, 1/2 cup water and the wine, cover, and let cook for another hour.  Taste and adjust the seasoning, using the salt, pepper, and granulated garlic along with the Italian blend. 


Remove the sausage and set aside on a cutting board to cool slightly.  Add the frozen peppers and onions, cover.  While the sauce is reheating, chop up the sausage in very small pieces.  Add the sausage back to the sauce and let cook for another two hours.  Now add the linguine and the last 1/2 cup of water.  Stir to separate the linguine and submerge all pasta in the liquid.  Cook for another 20 minutes, stirring half way through.

Serve immediately.

Did you enjoy this recipe?  Make any changes to improve it?  Let me know by posting something in the Comments section.  Thanks!

Thursday, October 23, 2014

#TBT - Hola! It's an Easy Paella

As promised - such a good dish for a casual dinner for friends. 


You will need a rectangular electric frying pan with a domed cover.  So by now you may have guessed that in addition to being the Aluminum Tin Queen, I am also Queen of the Electric Appliances.

Spices, Condiments, Oils:
kosher salt
black pepper
granulated garlic
Hungarian sweet pepper
1/4 teaspoon saffron
2 Knorr chicken bouillon cubes
4 tablespoons olive oil
1/2 teaspoon hot red pepper sauce (e.g. Tabasco, Texas Pete, Crystal)

Vegetables, Produce:
1 large or 2 medium yellow onions, chopped
1 medium or 2 small green peppers, chopped
4-5 cloves of garlic, smashed and chopped


Off the Shelf:

7 oz. chorizo (Goya or Tropical Brand), halved, casing removed, sliced into 1/4 inch half moons
1 1/2 cups uncooked converted rice (Uncle Ben's)
1-12 oz. bottle beer, poured into a 4-cup glass measuring cup
1-15 oz. can green peas (trust me), liquid drained into the beer
1-14 oz. can quartered artichoke hearts, liquid drained into the beer
1-6 1/2 oz. jar Fancy Pimientos, drained, patted dry, cut into pieces
15 or more small manzanilla olives (these are little green olives stuffed with pimiento)


Out of the Refrigerator:
6 chicken drumsticks
1 dozen littleneck clams
1/2 pound mussels
1/2 pound peeled rock shrimp (if these are unavailable, use more peeled white shrimp)
1/2 pound peeled white shrimp (medium or large, whatever is on sale)

Sprinkle chicken with some salt, black pepper, paprika and garlic.  Heat olive oil in frying pan at 325 degrees, and brown chicken on all sides.  Remove to a dish and hold. (This is where I use one of those aluminum trays, about 9x13.)  Next cook the chorizo for just a minute, and with a slotted spoon, remove it to the dish with the chicken.  Next cook both shrimp just until barely pink, remove them and hold in a separate bowl.  Do not overcook the shrimp.  Seriously.


Add the onions, green peppers, and chopped garlic to the pan; season with salt, pepper, paprika and granulated garlic.  I also like to sprinkle a very small amount of regular sugar over the onions for flavor and caramelization. Cook until onion is tender, not brown.  Add the rice and stir to coat with the oil in the pan.  Add enough water to the beer to make 3 1/2 cups liquid.  Add the hot pepper sauce to the liquid, then pour it all into the pan, stirring up any brown bits on the bottom of the pan.  Add the bouillon cubes and the saffron and stir.  Stir the cooked chorizo into the rice, and then place the chicken on top.  Cover the pan with the domed lid, making sure the little steam outlet is closed.  Lower the heat to simmer, and cook 25 - 30 minutes until the liquid is absorbed and the rice is done.  You will want to check on the rice and stir it about halfway through the cooking to make sure it is not sticking.

Uncover, remove the chicken, and stir the rice.  Add the green peas, the artichoke heart quarters, pimiento pieces, olives, and cooked shrimp and stir gently. Arrange the mussels, clams, and chicken on top of the rice.  Cover and cook another 10 minutes or until the clams and mussels are open.  Discard any that don't open.  Serve everyone a little bit of each type of protein, and pile that awesome rice high on each plate.  Eat with gusto, or at least with garlic bread.


Tuesday, October 21, 2014

From Fish Bait to Fine Dining - Mussels in Wine Sauce

Back in the early sixties, I spent several summers at the then-ubiquitous Jewish sleepaway camps of the New York Catskills.  We swam, we played a lot of volleyball, practiced shooting hoops, rode horses, and went fishing.  For bait, we gathered mussels from around the shallow shores of Lake Anawana, smashed the black shells, and retrieved the yucky interiors.  I caught the most beautiful fish with those sad bivalves.  Of course we never got to eat the fish we caught, as they were always thrown back for yet another day.

The mussels, though ... it seems that somewhere along the way from fish sticks to chilean sea bass, I also discovered something that European cooks have known for a long time.  Mussels make good eats, can be farmed and are sustainable, and are a lot more reasonable in price than scallops, oysters, or even clams.

This is my favorite way to eat them.  Hot from the pan, with the most delectable juices to sop up with bread.  I also love them cold from the fridge the next day.  If you have ever eaten mussels on the half shell at a Chinese buffet, then you know they are delicious when cold.  These are even better, because of the garlicky, herby sauce they've been resting in overnight.  Either way, you will be glad you tried them. 


This is my other favorite way to eat them, as part of a paella, and I will be publishing that recipe as part of Throwback Thursday #TBT later this week.  Besides tasting wonderful, they really add to the visual appeal. Thursday, I promise.

Back to the mussels in wine sauce - first, a little trick:  rinse the fresh mussels in a colander.  If any are open, and won't close when tapped with a spoon, throw it away, it's dead, Jim.  Place the mussels in a deep pot with a lid, add water to cover.  Stir in a couple of tablespoons of kosher salt, and fill the pot with ice cubes.  Cover, place in the fridge, and leave overnight or for as many hours as you can before cooking.  When ready to cook, dump into a colander and rinse with some cold water.  Shake off the excess water.  Debeard if necessary, then cook as usual.  This little soak seems to keep the mussels plump and tender when cooked.

2 tablespoons butter
2 tablespoons olive oil
10 cloves of garlic, minced
1 medium onion, chopped
2 tablespoons chopped fresh parsley (I like the curly kind.  That's the kind of hairpin I am.)
4 fresh basil leaves, chopped
2 teaspoons chopped fresh oregano leaves
salt, pepper, sugar

2 1/2  pounds fresh mussels, prepared as above
1 cup dry white wine


In a deep saucepan, heat the butter and oil together, then add the garlic, onion, parsley, basil, oregano, salt, pepper, and a pinch of sugar.  Heat gently for 10 minutes.  Add the mussels and the wine.  Cover the saucepan and turn up the heat until it boils.  Simmer for 8 minutes, until the mussels open.  If any of the mussels have not opened up, throw them out.

Sometimes, I take half of a red bell pepper, cut it into strips, and add it to the onions and garlic.  I also like to chop up some more fresh parsley and scatter it over the top before serving.

Hot or cold, these are delicious.  Enjoy.

Love the blog?  Hate the recipe?  Post a comment!

Monday, October 20, 2014

Ode to a Crockpot - Sweet and Sour Stuffed Cabbage


I recently read an Op Ed piece in the New York Times, where the writer expressed her feelings about the societal expectation of preparing daily home-cooked meals for children.  She was indignant, offended, and darn near angry.  After all, coming home after a long day at work doesn't leave time to whip up a pot roast, especially when the children have after school activities, homework, baths, and all that jazz.  She recognized that somewhere in that time period between the end of the school day and bedtime, the kids had to eat dinner, but expressed her longing for the days when the First Lady was not keeping pizza off the school lunch menus, and it was okay to do your dinner food shopping in the drive-thru at McDonald's.  The writer also expressed her not-inconsiderable feminist frustration that here we are in the 21st century, and mothers, i.e. females, were expected to cook for their spawn.

As the late President Richard Nixon would state, let me say this about that:  first of all, I'm a feminist - a real feminist, someone who faced blatant gender discrimination in the seventies, when I first started working, and had to push hard to make progress, failed in the face of a male-dominated industry, and then applied to law school to try to level the playing field.  I've been ready for Hillary for a long time, and furious that countries like India, Israel, and Great Britain have been led by powerful women executives, while we have not.  

Next, Michelle Obama needs to get out of the school cafeteria.  There is nothing wrong with pizza on Wednesdays or fried chicken on Monday.  It's all about balance and moderation. (Sometimes I still dream about those English muffin pizzas on the Wednesday lunch menu at Lawrence High School.) Third, I am firmly opposed to children having too many activities that eat up all their (as well as their parent's) spare time after school and every weekend.  Pick two, and let the kids have time to be kids. 

Fourth is that you don't have to cook every night.  True, my grandmother (she-who-raised-me) cooked a three course meal every night, but she was another generation, a stay-at-home wife and mother, and besides, the kitchen was always closed on the weekends.  I don't cook every night, in fact, I almost never cook during the week, because I've always been a working mother.  My schedule is the opposite of my grandmother's - I do all my major food shopping and cooking on the weekend, pack everything up in those ubiquitous aluminum pans that my cousin Steve Schneider likes to tease me about, and load up the refrigerator with enough food to feed my family for at least a week.  My son, now an adult, likes to eat late, so long after his dad and I are done with dinner, he pulls a goodly number of those tin pans out of the fridge, and fills up a plate with whatever combination of cooked comestibles strikes his fancy, and - are you ready for it? - he reheats it in the microwave.  


Admittedly, I think spending at least one of my days off from work frying artichoke hearts and basting chickens is a big treat, but I got the sense that the op ed author would rather scratch out her eyeballs with a fork.  For her and other parents who either don't like to cook, don't have the time or the talent to cook, don't have another parent in the home who is willing to pick up part of the cooking responsibility, and who can't afford decent take-out every night, there is, of course, always the last, best hope for a delicious and easy hot meal (and the reason for today's post)- the crockpot.  The crockpot is my go-to device on those occasions when I do plan to cook during the week, as well as one of the appliances I rely on during my weekend cooking marathons.  


This, my friends, is a crockpot, AKA a slow cooker.  This little beauty and I made our acquaintance in the fall of 1976, and we've been together ever since.  She is so old - like me - that her inner crock is not removable.  I think she is about 4 quarts, an adequate size for chili and soup, but not large enough for a couple of racks of baby back ribs or a nice big pot roast.  Until recently, I also had a round 5 quart cooker with a removable crock, but after almost as many years of faithful service, it passed on to that great appliance junk yard in the sky.  I am in the market for a replacement, and also checking out some 8 quart crocks, in case I ever feel the need to feed the population of a small city.  In the meantime, I rely most frequently on this 6 quart oval, which has two crocks, one of which is divided into two compartments.  Very nice when I want to serve cocktail meatballs AND little smokies, or two kinds of soup.


That is a lovely piece of stuffed veal breast in the crock, and by the time you read this, I will have posted that recipe.  For today, however, I am using both crockpots to create a relatively easy version of my grandmother's stuffed cabbage.  It can be prepared in stages, if you prefer, and I'll show how using the crockpot takes the stress out of assembling all of the components.  

To me, the biggest stress factor has always been the cabbage.  Either I have to deal with a huge pot of boiling water, trying to remove the rock-hard core of the cabbage so I can dip it in and out of the water to loosen the leaves (imagine cutting yourself and scalding yourself at the same time) or I have to plan three days ahead and put the cabbage in the freeze for at least overnight, and then let it defrost in the refrigerator and hope the leaves are soft enough to remove, stuff, and roll.

Instead, I took a nice big head of cabbage, placed it core-side down into my 6 quart crockpot, first cutting off about half an inch across the bottom so it fit under the lid.  I then added water about a third of a way up the sides, covered the crockpot, and cooked the cabbage head on low for 6 hours. When it's done, carefully move the cabbage to a large bowl, core-side up, and let it cool down enough to handle.  With a long thin knife, cut out the core and begin to carefully remove the leaves, placing them on paper towels to drain.  You will need 12 large yellow leaves, but do not discard the remaining cabbage just yet.


Here is my grandmother's recipe for stuffed cabbage, adapted for the crockpot:

1 large head of cabbage, cooked in the crockpot to yield at least 12 large leaves

For the filling:
2 pounds ground beef
1/2 cup uncooked long-grain converted rice (Uncle Ben's)
about 1/4 cup grated onion (grate the onion right into the mixing bowl)
1 extra large egg
granulated garlic and onion powder, to taste
1 tablespoon kosher salt
1 teaspoon ground black pepper

Combine the filling ingredients in a large bowl and mix together by hand.  Divide the filling into 12 equal portions, shaped like logs.

For the sauce:
2 large Vidalia onions, chopped into large pieces
canola or olive oil
2 cans of Campbell's condensed tomato soup
3 soup cans water
1-8 oz. can tomato sauce
1 sauce can water
1-6 oz. can tomato paste
kosher salt, ground black pepper, and granulated garlic to taste
3-4 tablespoons sugar
granulated citric acid (sour salt)


At the same time you start the cabbage, spray or oil the inside of a 4 quart crock, add the onions, drizzle on the oil, cover and cook for 6 hours on low.  Stir occasionally, and watch those onions caramelize without spattering oil all over the top of your stove.  When the onions are done, add all of the remaining sauce ingredients except for the citric acid.  Cover and cook on high for 2 hours.  After the first hour, taste the sauce and adjust your seasoning, including sweetness.  Then add about 1/2 teaspoon of the citric acid, cook the sauce another half hour, then taste again.  You want the perfect balance of sweet to sour.  Just keep in mind that the citric acid should be used sparingly, and take your time in achieving this balance.


Take a cabbage leaf and with a sharp knife, carefully shave off the thick part of the rib.  Repeat for all of the leaves.  This will make it easier for them to be rolled.  Then place one portion of meat on each leaf, and roll it up like a burrito or an eggroll. Set the finished rolls aside.


Rinse out the 6 quart crockpot.  Ladle some of the sauce on the bottom of the crock.  Break up some of the remaining cabbage into smaller pieces and place on top of the sauce.  Add a single layer of cabbage rolls, placing them seam-side down.  Ladle on enough sauce to almost cover them, then place the remaining cabbage rolls on top, crosswise from the first layer.  I fit 5 rolls on the first layer and 7 on the second.  Use some more of the broken up cabbage to tuck in between the rolls so that they fit snuggly.  


Finally, top with the rest of the sauce and more of the broken up cabbage pieces.  Cover and cook on low for 5-6 hours, or until the meat filling registers 165 degrees and the cabbage is very tender. I set my crockpot to cook for 5 hours, after which it automatically switched to the "keep warm" setting.  When I woke up this morning, it had been on "keep warm" for 2 hours, and was perfect.  My house smelled so good, I almost ate stuffed cabbage for breakfast!

Serve the stuffed cabbage directly from the crockpot or carefully move to a baking dish for later use.

Cooked stuffed cabbage reheats well and also freezes well. Just remember to place a piece of wax paper between the food and aluminum foil, if you are going to use the foil to cover the pan.  This recipe serves 12 as an appetizer, or 4-6 as an entree.

Try it, you'll like it - then leave a comment.  Love some feedback!